Home of The Small Art Company and a bit of British all sorts about my family, kids, home, art, mixed media, craft, photography, illustration, travel, cooking, organisation, teaching... Good to see you:)

Monday, July 30, 2012

Remember when...

I don't feel all that old, but sometimes I think about how much things have changed since I was a kid, a teenager even, and decide that actually, maybe I am getting on a bit!

So this is a list those in their mid-thirties, or thereabouts, may appreciate.
  • There were only sales in January, not year-round.
  • No 'buy one get one free' or three for two offers.
  • No store loyalty cards.
  • No lottery.


  • I remember life before M&Ms and Skittles. And when Snickers were Marathons and Starbursts were Opal Fruits.
  • You could only really buy cheese and tomato pizzas in the supermarket.
  • And ice-cream was pretty much vanilla, strawberry, chocolate or mint.
  • As for crisps, it was ready salted, salt and vinegar, cheese and onion and beef. Pickled onion Monster Munch was very exciting!
  • The ring pulls on drinks cans came off.


  • Friends never hugged each other and certainly never kissed on greeting! I clearly recall seeing friends at college do this for the first time and was quite bemused!
  • The clatter of milk bottles as the milkfloat came down the street.
  • Collecting milk bottle tops and silver foil for the guide dogs.
  • I remember half pennies and the introduction of £1 coins. And when 5p, 10p and 50p coins used to be huge!
  • My bus fare to school was 10p...


  • I remember just having 3 TV channels.
  • Sometimes you had to wait for a programme to be on TV. That meant watching the test card screen with the girl and the clown.
  • If you missed a film at the cinema, you'd have to wait a couple of years for it to come out on video and even longer for it to be on TV.
  • Missing any programme on TV was annoying as it could be years before it was repeated.
  • Finding a space on a cassette or video tape to try and record the Top 10 or a TV programme. Constant forwarding and rewinding!
  • The record section in Woolies - the large LPs, in front of those were the 45s, then CDs were introduced and in front of those were cassette tapes.
  • The weather man sticking on clouds, sunshines, rain clouds etc in say, Scotland and them falling all the way down to the south of England! 


  • No soft play areas, just the occasional small ball pit.
  • No antibacterial hand gel. A day at the farm just meant washing hands with soap and water before lunch.
  • The introduction of phone cards for public pay phones seemed very modern and advanced!
  • Deciding what to take a photo of, as you didn't want to waste your 36 exposures. Then having to wait months to get around to developing them.
  • When doing a school project, having to go to the library to get an address, or maybe phone directory enquiries and write off for information, then waiting weeks for them to send back an info pack. No Internet in those days!
  • Of course, no mobile phones. I didn't have one until two years after I left university!
  • I remember life before we had a video recorder and a Microwave. I've still never used a dishwasher...

The world has certainly changed. Things change so quickly nowadays. What do you remember from growing up??

Friday, July 6, 2012

Pitta Pizza Recipe

I always try to make something different for Saturday lunch and got this recipe from Change4Life Supermeals that Little W's Nursery gave out at a zumba and healthy eating session after sports day last week!

You need:

  • Pitta bread (I used large wholemeal pittas)
  • Tomato puree
  • Tomatoes (I used our homegrown ones - delicious!)
  • Mozzarella cheese
  • Mushrooms
  • Black pepper
  • Dried mixed herbs


Method:

  • Place the pitta bread on a baking tray.
  • Spread with tomato puree.
  • Lay slices of mushroom and tomato on top.
  • Slice the mozzarella and place this on as well.
  • Sprinkle the herbs and black pepper over the top.
 Cook for about 10 minutes on 190 degrees c (170 fan/gas 5)

Simple, tasty and perfect for a quick kids' lunch!

Thursday, July 5, 2012

How to make a kitchen blackboard / chalkboard tutorial and link party

I've wanted a blackboard in the kitchen for ages, so thought I'd have a go at making one. It was so easy! I'll write each step so you can make one for yourself.

I'll make this post into a link party. Please feel free to link up your own craft tutorials. I'd love to see what you've been up to!

So... You'll need:

Essential:
  • Chalkboard paint - I got a spray can in Hobbycraft, but I think you may be able to get it in B&Q or other DIY places (probably cheaper too!).
  • MDF - I used 3mm, or any flat object to paint, as long as it's not too heavy if you want to hang it on the wall.
  • Sandpaper
Optional:
  • Pencil
  • Jigsaw
  • Newspaper
  • Acrylic paint
  • Paintbrush 
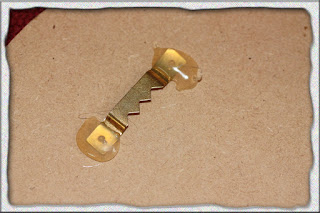
  • Picture hook if you want to hang your blackboard
For the chalk holder:
  • Light bits of wood
  • Wood glue
Step 1
Draw your design on the MDF. Keep it simple as you want to be able to tell what it is in outline form. I decided on a fairy cake/cupcake:


Step 2
Cut out the shape with a jigsaw (I got Mr W to do this bit as I don't trust myself with such tools!)


Step 3
You can skip straight to this bit if you've got a pre-cut shape that you want to use. Lightly sand the surface to prepare it for the paint.


Step 4
Place newspaper over any parts that you don't want black. I covered up the icing part that I wanted to paint  in other colours.


Step 5
Go outside for this and cover the ground with newspaper. Lay your board down and spray! I found that I needed quite a few layers to get a smooth finish. Mr W couldn't help 'assisting' here as he used to be a printer/sprayer when we met all those years ago! And he of course, thought he knew best:) It turned out he did know best in this case...

This pic is of another project, but you can see the spray can I used:


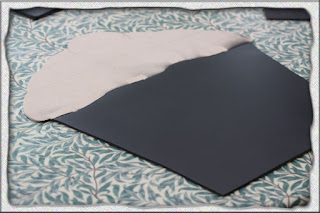
Cover up the parts you don't want painted:

Newspaper removed:


Step 6
Wait for about half an hour and see if it needs another coat. If not, then you're ready to paint the rest. I painted a coat of white acrylic first and then yellow for the icing, a red cherry, chocolate buttons and colourful hundreds and thousands.


Step 7
To make the chalk holder I used four of these small bits of wood I had left over from something:


I painted them yellow, stuck them together with wood glue and then glued it to the board.


Step 8
Attach a picture hook with a bit of wood glue to the back like so:


Here's the blackboard before the chalk holder was attached:

And here it is in place in the kitchen:


Had lots of lovely comments. I think it looks pretty good myself:)

So, let's see what you've been up to. Link your craft tutorials below. Can be anything at all, as long as you've made it yourself. No thumbnails this time, so choose your title carefully.

Rules:

  1. Please link to your specific post, not the whole blog
  2. Please link back to this blog, either in your linked post or another post
  3. Please try to visit and comment on others' links
  4. Have fun! 
*************************************************