Home of The Small Art Company and a bit of British all sorts about my family, kids, home, art, mixed media, craft, photography, illustration, travel, cooking, organisation, teaching... Good to see you:)

Friday, February 24, 2012

Sweet and Sour Pork

I've got two sweet and sour recipes to share with you. The first is a bit of a concoction of things we had in the fridge and cupboard. We were a meal short the other week due to a dinner cancellation at my mum and dad's. Can't believe this was because of the snow; it's so mild and sunny today!

Anyway, luckily I had some pork medallions in the freezer. I generally always have rice and we had a few veggies left, so this is what I came up with...


For the pork:
Drizzle a little soy sauce over the pork and grill until cooked.While this is cooking...


For the sauce:
6 tablespoons white rice vinegar
4 tablespoons sugar
2 tablespoons light soy sauce
2 tablespoons tomato sauce

(This was enough for 2 adults and 2 small children)

Heat ingredients in a pan. I added a little toasted sesame oil too. 

Serve with:
Rice
Carrots, broccoli, celery, peas and sweetcorn. These are just things I could find! You can add anything of course, but these were surprisingly yummy!

I'm making another sweet and sour recipe next week, so I'll post that too, as long as it turns out OK!

Monday, February 20, 2012

Polymer Clay Mokume Gane Tutorial


I first tried Mokume Gane a few years ago, but with a very different technique to that I'm going to show you here. It didn't turn out all that well, which is why I've only just had another go!

As usual, I research lots of techniques and then combine them to what works best for me.

Materials:
Transparent polymer clay
Pasta machine
Tissue blade
Variety of objects like a ripple blade, cocktail stick, texture sheets, tools... Anything really!
Various ways to colour like mica powder, metal leaf, metallic polymer clay, alcohol inks, coloured polymer clay, acrylic paint

Method:

Step 1
Roll out 4 sheets of transparent polymer clay using the setting 1 on your pasta machine. A pasta machine isn't essential, but helps keep your clay all the same thickness. It doesn't have to be too neat.


Step 2
Take 3 of the sheets and apply different, contrasting colours to them. Here, from left to right, is purple alcohol ink, yellow-green mica powder and copper metal leaf with orange alcohol ink stamped on top.


You can just use different colour clay without the transparent sheets if you don't have anything else to hand.

Step 3
Place the sheets on top of each other and the fourth transparent sheet on top of that. Roll these through the pasta machine, again on a thin setting.

Step 4
Cut in half with a tissue blade. Place one half on top of the other.


Step 5
Roll through the pasta machine again and cut in half as before, placing one half on top of the other. Make sure you keep everything the same way round.

I did this about 5 times. It really doesn't matter how many times though. One thing to bear in mind, is that the thinner your sheets, the more intricate the pattern.

Step 6
Once you feel you've got enough layers, push the sheets into a squarish shape. Don't worry about it all getting pushed and pulled, that's the whole idea. You can't really go wrong with this technique and the more you manipulate it, the more interesting your patterns will be.


Step 7
Now comes the fun bit! Take all your tools and press them into the clay. Use your fingers too.You can use a ripple blade as well. Be careful not to go all the way through though.


Then turn the clay over and do more on the other side. You can use a texture sheet, or a stamp too. Here's a stamp I made...


Step 8
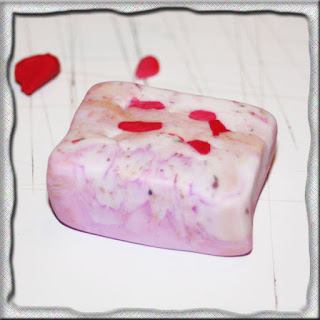
If you want to, you can push little bits of clay into the holes. I've used metallic red to fill some of the holes:


Step 9
You may need to put the clay in the fridge for half an hour before slicing. Then very carefully, slice a thin piece off the top, making sure you slice the same way as the layers:


When slicing, I press the clay onto the work surface and pull the blade towards me. It takes a little practise to get it right, but be careful!

I used slices to make this leaf:


The colours changed once baked, due to the alcohol inks. This is the final piece, for sale in my Etsy shop:


And here is another bag charm, in my Folksy shop (matching earrings available!):


It's quite addictive! Have fun:)

Wednesday, February 15, 2012

New Name and New Venture (yep, another one!)

As you may have noticed (or possibly not!), I have a new blog name - Blossom and Snowflakes. You can read a bit more on the 'About' tab just above here. My shops are still Careford Creations, but I really felt my blog needed a different name as it's about more than just my crafting. Have kept Frederick Frog though. Would feel lost without him!

As for my new projects, well, the photos on polymer clay is coming on nicely. See my recent tutorial for some pics. And my second new project is coming along. It's all to do with combining my love for different things. Somehow, I always have the need to put everything together... It's a bit of paper love, books, recording memories, photos, mixed media, altered art, polymer clay and recycling (I hate waste!). Am very excited about it and have been researching and experimenting for what feels like forever. Anyway, hope to post an update very soon.

Sorry no pics this time. Just wanted to really post about the new name. Better go and help Mr W get the little W's in bed...

Tuesday, February 14, 2012

Travel Tuesday - Durness, Scotland

OK, first Travel Tuesday post in a while and a little closer to home this time. Back in the summer of '96 Mr W and I took our second holiday together. We went camping in the Scottish Highlands. Scotland has always been a favourite place of mine. The rugged scenery, the beautiful beaches, the sense of complete remoteness...

We drove up to Durness one day. Durness is right at the 'top' of the country; the most northwesterly village in mainland Britain. It can only be accessed by a single track road and the area is apparently the most sparsley populated in Western Europe.

This here is Smoo Cave:


Mr W and I do love a cave! We visit every one we come across on our travels. This is the entrance:


What I remember most from this day is the rain. I remember sitting in the car and just watching it fall down in sheets. Truly mesmerising! We were generally very lucky with the weather though and spent some lovely days on the beaches, hiking and cooking outside. Ah, they were the days!


Saturday, February 11, 2012

Ham and Pepper Wrap

These wraps are a family favourite for Saturday lunch. We had them today and I thought I must share them with you all!


You need:
Tortilla wraps
Slices of ham
Jar of chopped, roasted peppers
Grated cheese (we use Cheddar)
Silver foil

Directions:
  • Place a slice of ham, a few peppers and some grated cheese on a wrap.
  • Roll it up.
  • Wrap in silver foil (we use the really cheap foil for this. You know, the stuff that's normally too short to be any use. It's just the right size for these).
  • Place on a baking tray and cook for 15 minutes on 180 degrees C / 356 degrees F (160 C / 320 F for a fan oven)
  • Take out, unwrap carefully (they get very hot!), eat and enjoy!
Absolutely delicious!

Friday, February 10, 2012

Voucher / Coupon Organiser Tutorial

Do you ever forget you've got supermarket money-off vouchers? Or just simply, lose them?! I keep mine on the freezer, held with a variety of magnets, as you can see here:


The other day I saw a simple idea (where, I can't remember, sorry!) which is basically a little holder to store them all in. I'm not sure if the one I came across was a handmade box or something else, but I thought I'd have a go at making one and show you how to as well.

Materials:

Essential:
Thin card

Ruler
PVA glue
Scissors
Pencil
Double-sided tape
Magnet

Optional:
Decorative paper
Letter stamps and ink pad
Other embellishments
Mod Podge
Scrap paper

I forgot to include Mod Podge in this pic. Mod Podge is glue for UK readers, who may not know.


Step 1
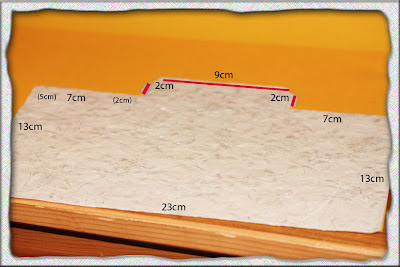
Draw a template on the back of your decorative paper. The size will really depend on the size of your vouchers of course, but for Tesco receipts, then these sizes are good: 23cm across, 13cm shorter side with a 'sticky out bit' (not sure what to call it!) of 2cm. The red lines show where there are extra tabs to help with sticking together. No need to worry about the measurements in brackets at this stage; they're just where you will score and fold later.


Step 2
Cut out the template and place on top of the thin card. Draw around this as well and then stick the paper on top with glue. Or you could just use decorative card in the first place, or use plain card.

Step 3
Turn over and sketch a kind of semi circle opposite the sticky out bit. You can do this directly on the card or cut out a template first.


I did mine about 4cm long and about 2.5cm from either end of the 9cm section.


Step 4
You may need to tape down stray edges depending on the type of paper you've used. Mine was a bit flyaway so I taped down some edges on the inside.

Step 5
Use a ruler and scissors to score lines where the folds will be (see the pics in steps 1 or 3). Basically, from left to right, you'll score at 5cm, 2cm, 9cm, 2cm and you'll be left with 5cm. And then across the sticky out bit and the three tabs.


Step 6
Time to decorate the front! All I wanted to add was the word 'vouchers' which I did using rubber letter stamps (99p from The Range) and Staz-on black ink.

Step 7
Now you can fold your box into shape using the score lines to guide you. I used double-sided tape to stick down the tabs. There's no tab for joining the back together as these measurements allow for overlap.

Step 8
I then decided to cover the front and sides of the box with Mod Podge. I use Mod Podge for decoupage. It gives protection to whatever you've stuck on.

Step 9
Your box is finished! Stick to the fridge or freezer with a magnet:

Step 10
Put your vouchers inside! Don't they look so much tidier?!


Thursday, February 9, 2012

Transferring Photos onto Polymer Clay Tutorial

Transferring photos onto polymer clay is really easy! I'll show you here how to do it. I did a bit of an experiment, so you can see the outcomes of 3 different papers and inks.

I first tried transferring images a few years ago, using transfer paper. Here are some of the things I made:


They turned out well, but transfer paper is expensive. I liked the sharpness of the images, but for my current projects, I was after something less... perfect. So, I've done some research and experimentation and here are the results...

You'll need:

Essential:

  • White or light-coloured polymer clay
  • Rolling pin
  • Images
  • Cold water
Optional:

  • Pasta machine
  • Tile
  • Tissue blade
  • Liquid polymer clay
  • Varnish
The first paper I used was Kodak photo paper, using a black and white image (beach, see below) printed on my inkjet. Second, I used a colour inkjet image (cupcake) on ordinary copier paper and thirdly, I used a colour laserjet image (flower). OK, so it's not an entirely fair test for all you scientists who might be reading. I know I should have used the same image each time! But I was still able to get a good idea of how well the images transfer.

Step 1

Roll out some white or light-coloured polymer clay. I use Fimo. You can use your pasta machine for this (please don't use it for food afterwards!) or just roll it out with a rolling pin.

Step 2
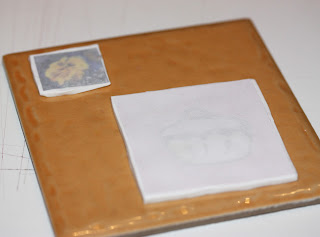
If you're using photo paper, take a tile, place the clay (cut to the size and shape you require) on top and spread out liquid clay on top of that:


Place the image face down.

For laserjet and inkjet images, just place the images face down on the rolled out clay; no need for the liquid clay.


Left to right above: laserjet, inkjet.

Step 3
For the photo paper, rub the back gently. Don't remove the image for this one.

For the inkjet and laserjet images, press down firmly but not too hard, otherwise you'll distort the clay, then wet your finger with cold water and rub the backs of the images.

For the laserjet image, I found the paper rubbed away in little bits and left a colour image behind (see top flower pic below). For the inkjet image, the paper lifted off in one piece and just left black outlines, as you can see below:


Step 4
With a tissue blade you can then trim around the image to the exact shape and size you want.


Step 5
Place the tiles in the oven and bake according to the manufacturer's instructions. Tiles aren't essential, but they do keep the clay flat.

Step 6
After baking, you can now peel off the photo paper. This one didn't quite work, as you can see (far left):


I've since read that Kodak paper doesn't work, which is what I used. It's worth trying the same method with other photo papers though, as these may give really great results.

As it is, I'm really pleased with the way the others turned out. The laserjet is in colour and quite rough, not smooth like the images I first did on transfer paper a few years ago. The inkjet images I'm also really pleased with, even though they're just black outlines. This is exactly what I wanted for my current projects.

Once your projects are finished, I recommend varnishing them to prevent the images wearing off.

So there you have it - a very simple way to transfer images onto polymer clay. No need for expensive papers or liquid clays either:)

To summarise:

Transfer paper - gives a sharp, colour image, but is a little expensive.
Photo paper - Kodak paper doesn't work, but others might. Need liquid clay for this however.
Laserjet copies - full colour transfer, a little rough.
Inkjet copies - only the black transfers.

Hope you enjoyed reading. Please take a look at some of my work with photo transfers, here in my Etsy shop and here in my Folksy shop. These have all been made using laserjet copies. I altered my photos to black outlines before transferring. I like the black for these particular projects, although you can see one colour image as well...


I've got another polymer clay tutorial lined up - Mokume Gane - coming soon!


Tuesday, February 7, 2012

Sloppy Joes!

I'd planned to make burgers last Saturday. Homemade burgers taste so much better than shop-bought ones. There's also the added bonus of knowing exactly what goes in them, so I don't mind the kids having them now and again!

However, I then came across a recipe for Sloppy Joes on Angie's wonderful blog, Echoes of Laughter. I didn't exactly know what a sloppy Joe was, but looking at the mouthwatering picture and the ingredients, they didn't look too dissimilar to burgers. So, I made them and they were delicious!


Here's the recipe (slightly adapted) from Angie's blog:

Ingredients:
500g minced beef
1 chopped onion
1 chopped green pepper
1 chopped red pepper
2 stalks of celery, chopped
Half a cup of tomato sauce
1 tablespoon vinegar
2 teaspoons chilli powder
1.5 teaspoons Worcestershire sauce
1 teaspoon sugar
Burger buns

Directions:
Cook the mince, onion, peppers and celery in a frying pan, wok or saucepan. When the meat is cooked, drain any fat.

While this is cooking, mix the remainder of the ingredients (er... apart from the burger buns!) in a bowl. Stir this into the beef mixture and simmer for about 10 minutes, stirring now and again.

Serve on burger buns. We also had potato wedges and salad. Honestly, you have to make these!

I always Google something when I'm not sure about it and was interested to read Wikipedia's list of other names for Sloppy Joes: Barbecues, Dynamites, Gulash, Hot Tamales, Manwich, Sloppy Janes, Slushburgers, Steamers, Taverns, Victory Burgers, Wimpies and Yum Yums! What a varied list of names! Basically, for anyone unsure, they're sloppy burgers.

Anyway, just a note to add - I've got a load of tutorials planned. Mainly polymer clay and household organisation at the moment. And I haven't forgotten Travel Tuesday! Today's post was meant to be Travel Tuesday, but I hadn't got round to thinking about it, plus I wanted to share the recipe with you! 


Friday, February 3, 2012

Organising Hats, Scarves and Gloves!

I've always been a pretty organised person. For as long as I can remember I've loved buying files and folders, diaries, notepads, memo boards... anything to help me keep things in their right place.

My house, however, doesn't necessarily look like I'm that organised. I put that down to the fact that it's not that big. I don't suppose it's tiny, probably fairly normal by UK standards, but I still think I could appear far more organised if I had more space for cupboards, shelves, boxes and so on. That's my excuse anyway!

Anyway, I am thankful for what I do have and thought that every week I'd show you little things I do to keep myself and my family organised.

So, to start off, here is our solution to storing hats, scarves and gloves.


It's a simple 4-basket wicker storage unit from Argos. We have a basket each - Mr W at the top, then me, then Little W and finally Toddler W. This is Toddler W's basket, with a lovely purple hat knitted by my cousin:


We keep the unit by the shoe rack, underneath the coats in the hallway. It's narrow and fits perfectly here.

Everything usually goes straight back in the boxes when we get home, although this week, it's been so cold that I've left it all in a carrier bag hanging on the pushchair. We seem to be getting later and later arriving at Nursery. Putting on all the winter accessories takes a lot of time... So I thought it'd be quicker this way, plus Toddler W doesn't always want to put anything on. She does seem to be learning how to keep warm this week though, but sometimes we're halfway there by the time she asks for her hat or something.

Come back soon for my next storage or organisation tip!